Setting up the Phone
Charging Station
Plug the power adapter into a power source socket to start using the charging station.

Handset
Please refer to the following steps in order to setup your WP825 phone:
- Open the battery cover.
- Insert the battery with the electrodes in the bottom left corner.
- Close the battery cover.

Handset Keys Description
The WP825 Wireless IP phone enhances communication and combines usability and scalability in industries such as warehousing, catering and retail as well as in factory settings. The following screenshot describe the the handsets LCD screen and the main hardware components.
- WP825

The following table describe the WP825 keypad keys.


WP825 keypad keys Description
Icons Description
Following table contains description of each icon that might be displayed on the screen of the WP825.


Figure 4: Icons Description
LED Status
Red Fast Flashing |
|
Green Slow Flashing |
|
Green Blinking |
|
Green Solid |
|
Red Slow Flashing |
|
Red Solid |
|
LED OFF |
|
Handset Menu
The handset has an easy-to-use menu structure. Every menu opens a list of options. To open the main menu, unlock first the handset and press “Menu” (softkey in the middle). Press Arrow keys to navigate to the menu option you require. Then press “Select” (left softkey) or OK/Selection key to access further options or confirm the setting displayed. To go to the previous menu item, press “Back” (right softkey). You can press Power key at any time to cancel and return to standby mode.


Figure 7: Handset Menu
Keypad
The WP825 keypad can be used by tapping on an input field. The keypad has 4 modes “Ab3”, “ABC”, “abc” and “123”. Default mode is “Ab3”.
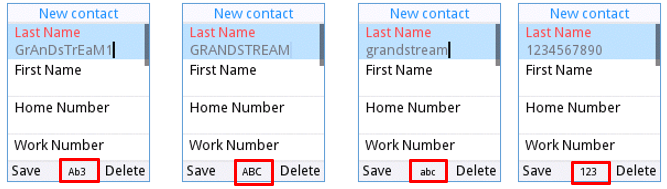
- “Ab3” Mode:
This mode allows to enter capital letters, small letters, digits and symbolic characters.
Following table describes allowed characters for each key.
| Key | Description | Key | Description | Key | Description |
1 | . , ’ ? ! ” – 1 | 2 | A B C a b c 2 | 3 | D E F d e f 3 |
4 | G H I g h i 4 | 5 | J K L j k l 5 | 6 | M N O m n o 6 |
7 | P Q R S p q r s 7 | 8 | T U V t u v 8 | 9 | W X Y Z w x y z 9 |
* | . , ‘ ? ! “ – ( ) @ / : _ ; + % * = < > $ [ ] { } \ ~ ^ # | ` & | 0 | Space | # | Switch mode |
- “ABC” Mode:
This mode allows to enter capital letters, digits and symbolic characters.
Following table describes allowed characters for each key.
| Key | Description | Key | Description | Key | Description |
1 | . , ’ ? ! ” – 1 | 2 | A B C 2 | 3 | D E F 3 |
4 | G H I 4 | 5 | J K L 5 | 6 | M N O 6 |
7 | P Q R S 7 | 8 | T U V 8 | 9 | W X Y Z 9 |
* | . , ‘ ? ! “ – ( ) @ / : _ ; + % * = < > $ [ ] { } \ ~ ^ # | ` & | 0 | Space | # | Switch mode |
- “abc” Mode:
This mode allows to enter small letters, digits and symbolic characters.
Following table describes allowed characters for each key.
| Key | Description | Key | Description | Key | Description |
1 | . , ’ ? ! ” – 1 | 2 | a b c 2 | 3 | d e f 3 |
4 | g h i 4 | 5 | j k l 5 | 6 | m n o 6 |
7 | p q r s 7 | 8 | t u v 8 | 9 | w x y z 9 |
* | . , ‘ ? ! “ – ( ) @ / : _ ; + % * = < > $ [ ] { } \ ~ ^ # | ` & | 0 | Space | # | Switch mode |
- “123” Mode:
This mode allows to enter digits only.
Following table describes allowed characters for each key.
| Key | Description | Key | Description | Key | Description |
1 | 1 | 2 | 2 | 3 | 3 |
4 | 4 | 5 | 5 | 6 | 6 |
7 | 7 | 8 | 8 | 9 | 9 |
* | . | 0 | 0 | # | Switch mode |
Tips using the keypad:
- To switch between the modes, users could press the # key.
- Press multiple times on same key to move forward between the allowed characters.
- Use Right/Left arrow keys to change the cursor’s position on the text entered.
- For languages that support letters with accents, the handset now supports typing letters with accents on modes “AB3”, “abc”, and “ABC”.
Manual connection
The WP825 support dual-band 802.11a/b/g/n/ac Wi-Fi, please refer to the following steps in order to connect to the Wi-Fi networks:
- On LCD menu, press Menu key and navigate to Settings → Network.
- Navigate to “Wi-Fi Networks”. A list of Wi-Fi networks will be displayed.
- Select the desired network to connect to. (Enter the correct password to connect if requested)
The handset will display Wi-Fi icon on the main LCD menu if the connection to the Wi-Fi network is successful.

CALL OPERATIONS
Placing calls
To place calls, you can use the following mode:
- Earpiece mode: pressing the off-hook / dial key to dial out.
- Speakerphone mode: pressing the speakerphone key to dial out.
- Headset mode: pressing the off-hook / dial key to dial out using connected headset.
During the call, you can switch the call mode by pressing the corresponding keys or connecting a headset.
Make a Call using a Line
Making calls require the use of SIP lines. So, you should first register the SIP account to the handset beforehand, after registering the sip lines, you can choose between them while trying to make calls by pressing the “Accounts” button displayed on the call screen. Please refer to the following methods to make calls using a line:
- Enter the desired number using the keypad.
- Toggle between the available lines by pressing the “Account” button to choose the line for making calls. (The account name will change on the screen when press “Account” button).
- Press Dial key
 , left softkey “Call”, # (Use # as dial key” must be configured in web configuration) to initiate the call or wait for 4 seconds and the call will be initiated automatically.
Note: Users can also initiate calls with handsfree mode using Speaker key  .
.
- To terminate the call, press Hang-Up key
 .
.
Notes:
- To dial from contacts list, choose a contact using navigation keys and press Dial key
 .
. - When having un-read voicemails on the handset, once accessing the dialing interface a stutter tone will be heard to notify users about voicemails that need to be read.
- The maximum length of dialed digits is limited to 30 characters.
Dialing from Call history
Users may use their call history entries to initiate calls. Please refer to following steps:
- Press Menu to bring up operation menu.
- Use arrow keys to reach Call History.
- Select the desired entry and press Dial key to establish the call.

Dialing from Phonebook
Users may use their contacts list to initiate calls.
- Press Menu to bring up operation menu and use arrow keys to reach Contacts or press Contacts key
 to access directly the contacts list.
 - Select the contact to call and press Dial Key to initiate the call.
Direct IP Call
Direct IP Call allows two phones to talk to each other in an ad-hoc fashion without a SIP proxy. VoIP calls
can be made between two phones if:
- Both phones have public IP addresses; or
- Both phones are on the same LAN/VPN using private or public IP addresses; or
- Both phones can be connected through a router using public or private IP addresses (with necessary port forwarding or DMZ).
To make a direct IP call, dial *47 followed by the IP address of the target. Following the below syntax (Example target IP is 192.168.1.10):
– Dialing *47192*168*1*10 (to use 5060 port by default)
– Users can specify the port number as follows *47192*168*1*10#5062.
Answering Calls
When receiving an incoming call, you can answer the call using following steps:
- Earpiece mode:
Press Dial Key to pick up the call, or “Accept” softkey (left softkey).
- Speakerphone mode:
Press Speaker Key to pick up the call.
- Headset mode:
Press Dial Key to pick up the call, or “Accept” softkey (left softkey) using a connected headset.
Note:
To answer an incoming call during an established call, press Dial Key, or the Speaker Key, or the “Answer” softkey. The incoming call is answered, and the original call is placed on hold.
Auto Answer
Users can enable Auto Answer feature to accept and automatically answer incoming calls.
If enabled, the WP825 will automatically answer incoming calls using speaker mode.
To activate / deactivate the auto answer feature:
- Using LCD Menu
- Press Menu to bring up operation menu.
- Use arrow keys to reach Settings ? Call Features ? Auto answer.
- Select which account will be enabling the Auto answer feature.
- Set “Auto–Answer” to “Enabled” and configure the auto-answer mode and press “Save” button.

- Using Web Interface
- Access Web GUI Interface.
- Navigate to Account ? Call Settings.
- Set “Auto Answer” to “Yes”. (By default, set to “No”).
Ending Calls
To terminate the calls, press Hang-Up key  .
.
Rejecting Calls
To reject an incoming call, press Hang-Up key  .
.
Call Hold/Resume
- During active call, press the right softkey “Hold” to put the established call on hold.
- To resume the call, press the right softkey “Unhold” while the established call is being on hold.

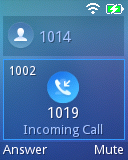
Call Waiting
This feature will notify you of a new incoming call during an established call and display the incoming call information visually on the LCD screen and a call waiting tone will be heard. If this feature is disabled, the new incoming call will be automatically rejected.
This feature is enabled from the Web GUI:
- Access Web Interface.
- Go to Settings ? Call Features
- Set “Disable Call Waiting” and “Disable Call Waiting Tone” to “No”. (Default is No).
- Press Save and Apply buttons to confirm the new settings.
Users now will be able to hear the call waiting tone and it will be visible as well on the LCD screen as displayed on the following screenshot.
Do Not Disturb
You can activate or deactivate the DND mode for your accounts registered on the handset from its LCD menu. If DND mode is activated, all incoming calls will receive busy treatment depending on your configuration (forward to voice mail, busy tone…).
To enable or disable the DND mode, Access LCD Menu ? Settings ? Call Features? Do not disturb and set Do not disturb to Enabled.

Call Forward
The call forward feature will allow you to forward all the incoming calls to the desired number. Three possible call forward types are available.
- Unconditional: All the incoming calls are immediately forwarded to the desired number.
- Time Based: Incoming calls are immediately forwarded to the desired number based on the configured time.
- Others: Incoming calls are forwarded to the desired number when Busy, when DND is enabled or when there is no response.
To enable the call forward, please refer to the following steps:
- Press Menu to bring up operation menu.
- Use arrow keys to reach Settings ? Call Settings ? Call forward.
- Select which account will be enabling the call forwarding feature and navigate to “Call forwarding”.
- Set “Call Forward” to “On” and select the call forwarding mode.
- Configure the parameters of the call forward mode and press “Save” button.

- Unconditional: All the incoming calls will be forwarded to the number set up in “All To” field.
- Time Based: All the incoming calls will be forwarded to the number as schedule in the time period. During the setup time, the call will be forwarded to the number in “In Time Forward To:” field. Other period the call will be forwarded to the number in “Out Time Forward To:” field.
- Others: The incoming call will be forwarded when the handset is busy or no answer after certain interval “Delayed Call Forward Wait Time (s)” or if the phone is set to DND mode.
Call Transfer
The WP825 support the call transfer feature, you can transfer a call to another party using one of the following ways:
- Blind transfer: Transfer a call directly to another party without consulting
- Attended transfer: Transfer a call with prior consulting.
Blind Transfer
- Press “Transfer” softkey during a call, and then enter the number you want to transfer the call to.
- Select Blind transfer by pressing on Blind key.
- The call is connected to the number you specified, and the LCD screen prompts Call Transferred.

Attended Transfer
- WP825
- Press “Transfer” softkey during a call, and then enter the number you want to transfer the call to.
- Select Attended transfer by pressing on Attended key.

- After transfer target answers the call, the following screen will be shown up. If the transferor taps on Confirm, the call wil be transferred, and the WP825 will hang up the call

- If the user taps on “Split” soft key to separate the calls, the user will talk to the second established call while the first call is on hold.

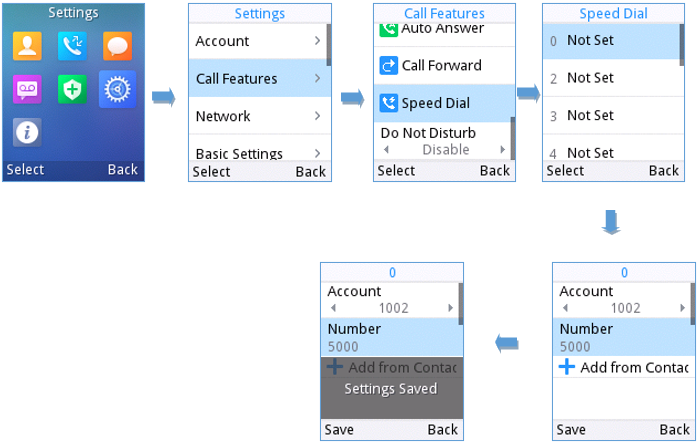
Speed Dial
Speed dial allows users to perform single-digit dialing to predefined numbers. This feature is particularly useful to speed up dialing frequently used or hard-to-remember numbers. A maximum of 10 speed dial numbers is allowed. For example, the digit key 2 is configured as a speed dial key and assigned the number 4000, the phone will dial out the number 4000 directly when you long press digit key 2.
To configure the speed dial (create, edit or delete) numbers, proceed as the following steps:
- Press Menu to bring up operation menu and use arrow keys to reach Settings ? Call Features ? Speed dial.
- Select the speed dial key to be configured and press “Select” softkey.
- Select the associated account and the number to be dialed.
- Press “Save” softkey to save the configured speed dial numbers.
3-Way Conference
The WP825 support creating a local conference with other parties (including handset starting the conference). To start a 3 Way conference, follow below steps:
- Place a call to the first party and press left softkey “Options”, then select “Conference”.
- Enter the number of the second party you want to add to the conference and press Join Conf.
- The conference will automatically be bridged before the third party answers the call.
Please refer to the following screenshots for more details.


Play Voice Mail Messages
- Press Menu to bring up operation menu.
- Use arrow keys to reach Voicemail tab.
- Choose the account, press “Select” button and enter Voicemail password then you can select visually and retrieve your voice messages saved on your voice mail and listen to each individual voicemail.
Note: this feature is compatible with UCM6xxx on v.1.0.20.6 or higher.

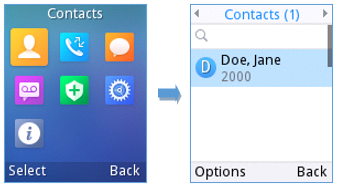
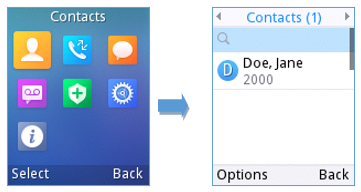
CONTACTS
Users can manage local contacts by adding, deleting and modifying every single contact. Users could access contacts under the handset Menu. Please, refer to the following screenshots:
The following operations can be done under local contacts screen:
- New contact: Under “Option”, users can select “New Contact” in order to manually add the contacts information and details. Please, see the following screenshots and table:

Last Name | Enter the contact’s last name. |
First Name | Enter the contact’s first name |
Work Number | Enter the contact’s work phone number. |
Home Number | Enter the contact’s home phone number. |
Mobile Number | Enter the contact’s mobile phone number. |
Groups | Choose the group you want to include your contact into. |
Ringtone | Choose a specific ringtone for the account’s received calls. |
Account | Choose the default account you want to dial with this contact. |
Primary | Select which number is the primary choice. |
- Search for a contact: in case finding a specific contact among a batch of contacts is difficult, users can press the middle button for “Search” and enter the name of the contact to find it easily.
- Send Message: Select a contact to send IM message, up to 160 characters.
- Dial out from Contacts: Select the needed contact and tap on the dial key
 to call it directly. The phone will use the configured account on contact’s information to dial out with.
 - Delete: Users can delete a specific contact by tapping on “Delete contact”.
- Delete All: Users can delete the whole list of local contacts by tapping on “Clear all contacts”.
CALL HISTORY
Call history provides users access to phone’s call logs in different categories and help users to make some operations directly. Call history can be accessed under menu as shown on the following figure:
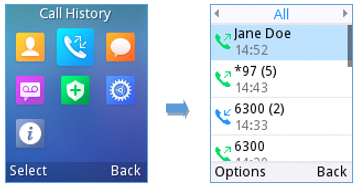
There are four different categories in the call history. Users could use the phone’s right and left arrows to view the following categories: All Calls, Missed Calls, Dialed Calls, Received Calls.
Dial Out from Call History
Select one of the call history log and tap on the dial key  to call this number directly. The phone will use the same account as the call log to dial out.
Call History Options

- Add to contacts: Users can tap on this option to add the number listed on the selected call history entry to local contacts.
- Edit before dialing: Users could copy the number to the dial screen in order to edit it before dialing.
- Delete: Users could delete the selected call history log by tapping on “Delete”.
- Delete all: This option helps users to clear all the call history.
Was this article helpful?
That’s Great!
Thank you for your feedback
Sorry! We couldn't be helpful
Thank you for your feedback
Feedback sent
We appreciate your effort and will try to fix the article